
Many of us have been using Windows for a
long period of time – may be you guys have started from Windows 95 like
me. From there it has been a long way till the recent Windows 7.
Windows XP started the graphics revolution which continued through Vista
(but compromised OS speed for its luxury graphics and huge demand for
system resources) and reached up to Windows 7.
Many of us have been using Windows for a
long period of time – may be you guys have started from Windows 95 like
me. From there it has been a long way till the recent Windows 7.
Windows XP started the graphics revolution which continued through Vista
(but compromised OS speed for its luxury graphics and huge demand for
system resources) and reached up to Windows 7.When Windows Vista
entered the market, the main reason many a guys switched to vista from
XP was for its killer graphics and improved features. The entry of Vista
gave the hardware market a much needed push – I know we all upgraded
our system just to install and experience Windows vista. But even with
huge system resources supply for a PC usage – say like 2 GB RAM, 1 GHz
processor, Vista remained an ass in the pain because of its speed – it
really sucked. This is one key reason Microsoft came soon to market with
a Windows 7 – with optimum graphics,features and better speed. I like
Windows 7 for its perfect blend of everything.
Now lets take a look at – Can we make Windows 7 even faster ?
Yes its possible. Here I am listing some
of the possible ways and its effect on system performance. Our
objective is to improve speed of Windows 7 without hurting overall
performance in terms of graphics and features.
1: Disabling Aero Theme

Do we really need an Aero theme ? Now
before starting to turn your back – just give a look at how often you
use your Aero theme – except for fancy and some occasion show offs to
your friends ? Chances are high that you dont need an aero theme for a
reasonably good graphics performance of your PC. In such a case – I
recommend you disable your Aero theme which will save you a lot of
hardware resources and video graphics memory.
Right click on “Desktop”>select
“Personalize”>select “Window Color” tab>Untick the box that says
“Enable Transparency”> then click on “Open classic appearance
properties for more color options”> then Select standard Windows 7
theme.(You are free to choose your own – I just said a default one.)
Note: Disabling “Aero”
alone can give a much higher speed boost to your Windows 7. If you use a
modern high end laptop, you just need to do this to get a really fast
performance from your operating system. Well that just doesn’t back me
from listing other possible methods 
2. Disable Unwanted Visual Effects
Ya we have disabled Aero but still there
are many unwanted visual treats in Windows 7. See am not saying all
these are unwanted – if you have enough system resources and you paid
for it – you better use it. These tricks are for people with low system
resource PC’s. Here’s the path:

Right click on “Computer” > Select
“Properties”>Click on “Advanced System Settings” on left pane> Now
“System Properties” window will open> Select “Advanced” tab >
under “Performance” click “Settings”>
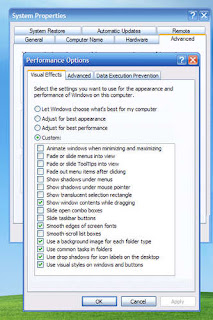
and select “Custom”> Now
uncheck all options and Select only last 4 options. And you are done
Now Log off and Log on your Windows 7 to see how it worked.
3. Disable User Account Control feature in Windows 7
This is not every ones cup of tea – but
really useful for people who is the single and only user of their
PC/Laptop. If you are the one and only one user of your computer – then
UAC is really unwanted. Disable it.

Go to Control Panel>Open “User
accounts and Family safety”>select “User Account”>click on “User
account settings” link> drag the slider to “Never Notify”>click
“OK” and reboot your system.
4. Setup Windows 7 “Ready Boost Service” for extra speed boost
Its just the idea of using extra memory
from your USB Pen drive. You need to plugin a USB pen drive first. Then
configure your Windows 7.

Open “Computer”> Right click on “Pen
Drive Icon”> select “Ready boost” tab> select “Use this device”
check box. Okay- that's all about it. You can configure how much space of
this pen drive should be used for “Ready boost”. This method is really
useful while launching bulky applications like Adobe Flash and
Photoshop,
No comments:
Post a Comment
Don't be shy in leaving your valuable comments.Your comments will help me to make my blog a better one.